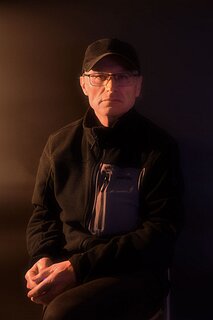
Author Jiri Novacek (*1959)
Welcome on my WEB sites.
I actually started out as a young painter, learning the ropes under the guidance of academic painter Josef Kleček. He gave me a solid foundation in fine art and taught me the rules of the craft. To this day, those painting insights are incredibly useful in my landscape photography. For me, being able to control the whole process from start to finish is the main reason I fell in love with shooting landscapes. It’s the perfect mix of nature and the high-tech gear developed over the last 50 years. Yet, all those classic painting rules still apply. Every single photo has its own story and demands both physical and mental effort. Plus, modern photography requires deep knowledge across various fields. IMO, the internet is flooded with flawed tutorials published just for the views. My personal golden rules for creating high-quality images mean going step-by-step—from camera settings and editing to the final print, while constantly testing the details and color purity. I’d love to use this space as a quick guide to share how I create my photos and explain the key parts of the process. Think of it as a shortcut to get in just a few minutes what took me long years to discover. Enjoy the ride!
My gear
Camera Nikon D850, wide lens Tamron zoom SP 24 - 70mm F/2.8 Di VC USD G2, wide lens Zeiss Otus 1,4/28mm, standard Nikon AF-S NIKKOR 50mm 1/1.4 G, long zoom lens Tamron 70 - 210mm F/4 Di VC USD, Tamron long lens zoom SP 150 - 600mm F/5 - 6,3 Di VC USD G2, Tamron tele converter 2x, Soligor Extension Tube N/AF 36mm - 20mm - 12mm, HOYA PRO 1 Digital Filter Circular PL LPF DMC, K&F concept Variable ND 3 - 1000 nano - D Series, Tripod SHERPA PRO CF 435, Genesis rotator BASE IR - 64, head Velbon PH - 250 B, Rail Leofoto NR - 200, backpack K&F concept 25 L ALFA, software Adobe Bridge, Adobe Lightroom Classic, Adobe Photoshop 2026, Adobe Camera RAW, PTGui Pro 13.9. App Foto Tool 2025 V 1.81.31, qDSLRDashbouard V3.6.15 arm64.
Intro
Wandering through nature and bringing home great photos is a dream for many people who, just like me, fell in love with photography. But look, starting out is tough in any field. What looks absolutely stunning in real life often loses its magic on camera. There are just so many things that affect the final shot. You have to realize that our brain, through our eyes, sees things totally differently than a camera lens. Our eyes actually have a pretty narrow focus (around 5 degrees). When we look at something, we only process that tiny part of the view in perfect detail. The rest—our peripheral vision—is blurry, and the brain just takes it as background noise. To see a whole scene, our eyes have to scan it piece by piece, and the brain constantly pieces the data together. A camera doesn’t do that. It has to capture everything at once, in a single layer. And that’s where the struggle begins. Where should you focus? What aperture or ISO should you choose? A camera is built differently than the human eye, so you really need to make the most of what your gear can do. Cheap cameras usually lack the features you need for a solid landscape photo—like manual mode, bracketing, or white balance settings. That's why it's good to know what your camera is actually capable of. Even though mirrorless cameras are the big thing now, I’m old school and still prefer DSLRs. Looking at a landscape through an electronic viewfinder on a mirrorless camera just isn’t it—you’re basically looking at a screen. That’s why DSLRs still have their place on the market. In my later years, I treated myself to a Nikon D850. It’s got everything a camera should have, from an FX sensor to all the features you need for landscape photography (the full-frame sensor and 47 megapixels are a killer combo). Plus, you can still easily buy lenses for this model. When it comes to landscape, shooting from a tripod is a must for me. The camera has to be rock-solid to get the sharpest photos possible. In the next chapter, we’ll dive into the gear itself.
Gear
Landscape photographers spend a lot of time outdoors, meaning both they and their gear must stay dry. You already know how to dress for the weather. When it comes to camera backpacks, water resistance is key. If I’m out in the rain all day, I need absolute certainty that everything inside is safe. Backpack capacity depends entirely on the gear you carry. To save my back, I’ve stripped my setup down to the essentials: a camera body, two lenses chosen based on the conditions (a wide-angle and a telephoto), filters (circular polarizer and variable ND), plus spare memory cards and batteries. For maintenance, I carry a lens cleaning pen and a microfiber cloth for the rest of the body. A sturdy plastic bag also comes in handy for covering the camera during a downpour. As a rule, I avoid changing lenses outdoors. Dust and pollen are the worst enemies of photo gear. My tripod is a mid-sized carbon fiber model. While a heavier tripod provides more stability during long exposures, nobody wants to haul a ten-kilo beast up a mountain. During a trip to Mexico, the sheer weight of my backpack actually injured my back. Health comes first—there’s no point in lugging 13 kg of camera gear up a 4,500-meter volcano. I used to use a wireless remote shutter release. However, since switching to bracketing, I rely solely on the self-timer. One thing I still haven’t quite figured out is how to carry the tripod while hiking. It can be strapped to the backpack, but it tends to sway and throw off your balance with every step. So, I just carry it in my hand. It also doubles as a useful wading staff when crossing mountain creeks, or as a drying rack for damp clothes. For those who wear prescription glasses, I highly recommend packing a spare pair in a hard case. If your main glasses wash away in a river, you'll have a backup—and more importantly, you'll still see sharply. Next time: How to choose the right time and place for shooting.
Let’s look past the current trend of shooting strictly at sunrise and sunset—a style popular simply because people love the gorgeous, vibrant colors nature puts on display. A truly skilled photographer can shoot 24 hours a day. It’s important to understand this and not rely solely on these brief moments of natural ecstasy. Today’s photographers often flock to the mountains, where compelling compositions are everywhere, and they don't have to worry about moving subjects like trees. There, they can easily use long exposures to create that smooth, streaky cloud effect. On the other hand, capturing something like blossoming trees in broad daylight is where the real artistry lies. Branches sway in the wind, lighting conditions shift constantly, and harsh, direct sunlight can ruin an image with deep, pitch-black shadows. Composition is the foundation of any great photograph. The goal is to find a vantage point that gives the image a 3D feel rather than leaving it flat. Sometimes, just taking a single step to the side is all it takes to turn a shot into something spectacular. The path you are walking on can serve as a powerful compositional element. Shooting in enclosed areas, such as rock cities, is incredibly challenging due to both tight framing and the extreme contrast between highlights and shadows. Finding a strong composition is much easier in open spaces. In the mountains, you have peaks and the sky as your background, a valley or a lake in the midground, and boulders or wildflowers in the foreground. I use this layered composition often because it adds immense depth. When it comes to rivers and waterfalls, getting a great shot requires diffused light—meaning an overcast sky. Harsh sunlight completely shatters the scene. If the sun is beating down, your best bet is to head deep into the woods, where the dense canopy softens the light. Personally, I love shooting clouds; their shapes are infinitely variable. When capturing them, I shoot bracketed panoramic sequences. Once merged, the clouds create a beautiful sense of perspective. Ultimately, there is no golden rule for where to shoot. We all see the world through our own eyes. As one famous photographer put it: "Photography is simple. You just have to be in the right place at the right time. "Next time: Essential Camera Settings.
Camera Exposure Settings
The great thing about modern digital cameras is that if a shot doesn't work out, you can just delete it and try again without losing a penny. But here is the catch: you need to figure out why it went wrong so you can avoid the same mistake next time. Just shooting from the hip and hoping for the best isn't very PRO. Luckily, your camera can show you a histogram (the light distribution chart) or flash the overexposed areas right on the screen (commonly known as "blinkies"). Before we dive into nailing the perfect exposure, let’s talk about how we actually perceive light. When you look at a landscape, your eyes instantly lock onto the brightest spots. The dark or black areas are mostly ignored. It seems we are hardwired for highlights—they carry the core information for our visual brain. And that’s exactly what my exposure method is built on. Every single exposure relies on the "exposure triangle": Aperture, Shutter Speed, and ISO. Aperture controls the size of the lens opening, shutter speed determines how long the sensor sees the light, and ISO is the sensor's sensitivity. The more you stop down your lens (using a higher F - number), the less light hits the sensor, but your depth of field expands. This is awesome when you want the entire scene sharp from front to back. However, it comes with a nasty side effect: as light passes through the tiny aperture blades, it bends. This is called lens diffraction, and it degrades your overall image sharpness. The rule of thumb is to stop down only as much as absolutely necessary. Personally, I find f/11 to be the sweet spot where the balance between depth of field and diffraction is still perfectly acceptable. Shutter speed is completely dependent on the ambient light. On a cloudy day, using the exact same aperture and ISO, your shutter speed will naturally be much longer than under a bright, sunny sky. Long shutter speeds can’t freeze fast action, meaning anything moving will turn into a blur. I intentionally use this effect with flowing water or the sea to get that silky, intentional motion blur. On the flip side, if I want to freeze moving subjects and keep them tack-sharp, I dial in a fast shutter speed. ISO comes to the rescue when the scene is dark and you desperately need a fast enough shutter speed. For example, a tree blowing in the wind at sunset will only stay sharp if you bump up the ISO enough to get a shutter speed of at least 1/125 sec. But again, there’s no free lunch. Bumping up the sensitivity introduces digital noise. The sensor inside the Nikon D850 handles noise incredibly well up to ISO 800. However, once you cross ISO 2000, the noise starts creeping in fast. That is why I personally try never to go above ISO 800.
Now, let’s look at how to dial in the perfect exposure. Here is a practical example to show how these three elements play together: Let's start with basic Manual mode settings: Matrix metering, aperture f/11, and ISO 100. First, point the camera at the brightest part of the scene. Adjust the shutter speed until the exposure meter hits the center (0). Let’s say this gives you a reading of 1/1000 sec for the highlights. Next, frame the darkest part of the scene and center the meter again—let’s say it reads 1/125 sec. Now you know the dynamic range of your scene. Going from 1/1000s to 1/500s is 1 EV (or one stop), from 1/500s to 1/250s is another 1 EV, and from 1/250s to 1/125s makes it 3 EVs in total. To make sure everything fits into a single frame, turn on the live histogram and look at the scene. Adjust your shutter speed so that the right side of the histogram curve just touches the right edge of the grid. This technique is called ETTR (Exposing to the Right). Since our eyes are highly sensitive to highlights, this ensures you don't blow out the bright details while keeping the shadows safe within the sensor's capability. If you compare this to what the camera’s automatic Matrix metering suggests, you might see a difference of about 3/4 of a stop. That’s because Matrix metering simply averages out all the light in the frame. If you ever find out that the contrast in the scene is way wider than what your sensor can capture in one go, it's time to turn on exposure bracketing (BKT) to map the full dynamic range of the scene.
Getting It Sharp: Focus Secrets for Easygoing Landscapers
Unlike sports or portrait photography where you just lock focus on your subject, landscape photography gets a bit more technical. Let’s break it down with a classic example. Imagine a scene with a field of wildflowers in the foreground, a calm lake in the midground, and epic mountain peaks in the background. If you want every single detail tack-sharp from front to back, you run into a massive roadblock. Let’s say you’re shooting with a 28mm wide-angle lens at f/11. To get those foreground flowers sharp starting from 1 meter away, you’d need to focus at 1.5 meters. But here’s the catch: your Depth of Field (DOF) will top out at just 3.7 meters. Anything beyond that 3.5-meter mark is going to be blurry. Now, if you shift your focus just half a meter further to 2 meters, your foreground at 1 meter falls out of focus, even though your maximum sharp distance stretches to 9.7 meters. Your background is still a soft mess. So, what’s the workaround? You need to shoot a sequence of images using different focal planes—a technique called focus stacking. For this specific scene, three frames will do the trick: The Foreground Shot: Focus at 1.5 meters (sharp from 0.9 to 3.7m). The Midground Shot: Focus at 2 meters (sharp from 1.1 to 9.7m). The Background Shot: Focus at 5 meters or beyond (sharp from 1.6m to infinity).Blend these three frames together in post-processing, and boom—you get a final image that is crisp from 1 meter to infinity. Some modern cameras even have a built-in focus bracketing feature that automates this entire process for you. On the flip side, if the closest objects in your frame are more than 10 meters away, things get way easier. In our case, you can just stop down to f/8, focus at 5 meters or beyond (treating everything as the background), and you're good to go. These numbers aren't random; they are dictated by lens physics. Every focal length and aperture combination has a specific Depth of Field (DOF) that determines what stays sharp. I highly recommend downloading a mobile DOF calculator app. It visually maps out your sharp zones and makes sure your settings are spot on before you click the shutter. Why stress over this? Because a missed focus is fatal. You can easily fix a bad exposure or clean up digital noise in post, but blurry focus is a total photo killer. As you can see, you can't always capture the whole story in a single exposure. Up next: More camera settings you need to know.
Other Camera Settings
I shoot landscapes exclusively in Manual Mode (M) to maintain full control over all exposure parameters. For White Balance (WB), I lock the color temperature at 5000K with a Magenta tint shift of +0.75. I strictly shoot in RAW (Nikon NEF format) at 14-bit depth, utilizing the sensor's maximum resolution and quality. My color space is set to sRGB, and the Picture Control is set to Neutral, with Clarity lowered to -1 and Contrast dialed down to -2. All in-camera processing features, such as High ISO Noise Reduction, Vignette Control, and Active D-Lighting, are turned off. To prevent shutter shock and camera shake, I enable the Electronic Front-Curtain Shutter (EFCS). For exposure bracketing, I use a 2-second self-timer delay with an Under/Over/Metered (N/-/+) sequence. Autofocus is switched off. I have saved this entire configuration as a user preset for instant recall.
Note 1: My previous White Balance settings didn't always match the actual lighting of the scene. Dark greens, especially in foliage, often lacked sharpness and suffered from digital noise. Working together with an AI, we identified the root cause: the Picture Control settings for Clarity and Contrast were set too high in the positive values, and there wasn't enough magenta dialed in. That is why I am sharing my current setup here. Keep in mind that your camera sensor might behave differently!
Note 2: If you capture images in any format other than RAW, you are throwing away a massive amount of image data and dynamic range. Ultimately, these settings prove that a landscape photographer doesn't need fancy, bloated camera features. In fact, fewer gimmicks often lead to better photos.
Exposure Bracketing: The Key to Higher Dynamic Range
As mentioned above, when a scene features a high dynamic range that exceeds what a single 3 EV shot can capture, I switch to exposure bracketing. By capturing multiple frames at different exposure levels, the final blended image contains significantly more data, resulting in a much wider dynamic range. I set the camera to a 5-shot bracket with 1 EV steps when shooting with the sun behind me, or 5 shots with 2 EV steps when facing directly into the sun. Pressing the shutter triggers a 2-second self-timer delay, allowing any camera shake to settle completely. The camera then captures the 5-frame sequence: the metered base exposure, followed by underexposures at -2 EV and -1 EV, and finally overexposures at +1 EV and +2 EV (when shooting away from the sun). The base exposure is determined using the method described earlier. This covers a total dynamic range of nearly 5 EV. Once the 5 frames are recorded, I inspect them to ensure both exposure and sharpness meet my standards. Do not worry if you see clipping in the highlights of the overexposed shots or in the shadows of the underexposed ones—this is not a mistake. The overexposed frames capture clean, high-quality shadow detail, while the underexposed frames preserve the highlights (like the sky). This is the whole point of bracketing: capturing usable data from both the brightest and darkest areas of the scene. If we skipped bracketing and relied on a single shot, lifting the shadows in post-processing would yield poor results, introducing heavy digital noise and color loss. Conversely, trying to recover blown-out highlights in an editor would result in data-less gaps and nasty posterization or moiré artifacts. The bracketed frames are ultimately blended in post-processing into a single image with massive dynamic range.
Note: When using exposure bracketing combined with a 2-second self-timer, the Nikon D850 automatically fires the entire sequence with a single press of the shutter button. This completely eliminates the need to touch the camera between shots and prevents any accidental movement. It is a fantastic feature.
Panoramic Photography
I must wholeheartedly agree with the late Jan Smid, MQEP, that creating panoramas is a grand adventure that offers unparalleled compositional freedom and allows us to view the world through a completely different lens. However, before diving into panoramic photography, you must fully master everything described above. This process is unforgiving, and any minor mistake will inevitably come back to haunt you. Aside from the equipment already mentioned, what else do you need? First, a tripod head that allows you to align the camera correctly relative to its axis of rotation. Personally, I have upgraded my setup with an indexing rotator, which lets me dial in precise horizontal click-stops so I never have to guess the correct frame overlap. Second, you need software capable of stitching the photographs into exposure layers. Trying to manually stitch dozens of images in an editor is an exhausting, uphill battle with highly questionable results. And finally, the most critical question: how do you actually do it? Once the hardware is ready, you must ensure that parallax is eliminated and the nodal point (entrance pupil) is perfectly set. Every lens and focal length has its specific alignment position along the camera’s optical axis. The tripod base must be strictly level. I verify this across all axes using both the bubble level on the tripod and the virtual horizon in the camera’s Live View. You can use lenses with various focal lengths for panoramas, which will alter both the angle of view and the required step interval on your rotator. Software developers generally recommend a 20% frame overlap. Too much overlap bogs down the software with unnecessary data, while too little risk stitching failures. An indexing rotator solves the horizontal overlap problem with 100% reliability.When you choose a scene for a panorama, select the appropriate lens: a wide-angle lens for closer foregrounds, or a telephoto lens for distant landscapes. With wide-angle lenses, three horizontal frames are usually enough, plus one extra frame on each end to allow for cropping—amounting to 5 shots per row. Since the camera is mounted vertically (in portrait orientation) on the tripod and the angle of view is wide, you will need fewer rows. Usually, a bottom row and a top row are sufficient, totaling 5 x 2 = 10 frames per exposure layer. Telephoto lenses require significantly more shots due to their narrow angle of view. Here, you must be extremely diligent with the rotator step interval and lens vibrations; even a microscopic nudge during exposure translates to a massive shift on the horizon. Crucially, every single frame within the sequence must be captured using identical exposure settings (aperture, shutter speed, ISO, and White Balance)! Once captured, I import the RAW sequence into Lightroom Classic. After making the necessary adjustments, I export them as TIFF files for stitching in PTGui. Since PTGui is an incredibly powerful but highly complex software with intricate settings, I will dedicate a standalone section to it later.
Creating the Base Image for Editing
When I nail the base exposures right in the camera—usually using bracketing—it saves me a ton of time in post-processing. While editing can elevate a photo, it can also completely ruin it. My goal is always to preserve the original scene, the mood, and the authentic color palette. Heavy-handed editing creates an unnatural look. Our brains have built-in templates of how the world should look, and when an edit doesn't match reality, it just feels wrong. I love trees, especially solitary ones standing out in the landscape. I shoot them with deep respect because they carry a sense of eternity and pure beauty. Photographing trees might seem like an easy task, but it comes with a unique set of technical challenges. When you bracket, the frames might look identical at first glance. However, the slight time gap between exposures creates absolute chaos in the tree canopy due to wind movement. If you try a standard blend later in Photoshop, you end up with so many double branches and blurry leaves (ghosting) that the image becomes completely unusable. Another crucial requirement is a fast shutter speed. If your bracketed source frames have motion blur in the branches, there's no way to fix it later. That's why I push my ISO up to 800 to ensure the branches stay tack-sharp. I have to make sure that even the longest exposure in the bracket sequence (the overexposed one) doesn't drop below 1/125s, which is the limit for freezing moving branches. This means my base exposure needs to be at least 1/500s. In broad daylight, this is easy, but under overcast skies, shutter speeds quickly slow down. Once I ensure that all five bracketed frames have sharp branches, I import the RAW (NEF) files into Lightroom Classic. I select them all, right-click, and run the Enhance function. Next, I edit the base exposure: I set Texture to -11, Clarity to -7, and apply Lens Corrections for the specific lens used. Then I select all five frames and hit Sync Settings to match them. Now, the adjusted files are ready for Photo Merge to HDR.Here comes a crucial step: for the actual blend, I select only three frames out of the five—the ones with the most useful data for the merger. If an image is too dark, Lightroom might pick it as the reference frame, which throws off the overall color rendering. As I mentioned before, we need to stay within the brighter tones. Sometimes I test different combinations of three frames multiple times until I'm fully satisfied.The Merge to HDR function in LRC has one massive advantage: its deghosting feature can eliminate almost all artifacts. I usually set the deghosting amount to Medium. Before LRC saves the final DNG file, it gives you a preview to check the results. You can also look at the HDR area on the histogram to see exactly how much dynamic range data you've gained. Finally, I export the DNG as a 16-bit TIFF for further editing in Photoshop. Before diving into the final Photoshop workflow, I want to talk about my core editing philosophy—a principle I learned back in my youth through painting. But more on that in the next section.
My Philosophy on Landscape Photo Editing
Photography should always be edited with human perception in mind. Most images captured by a digital sensor are flat—not just in their 2-D dimensions, but also visually. Our brains perceive a scene very differently from how a camera sensor records it. That is why our post-processing must focus on specific elements to recreate reality. Objects closer to the viewer appear darker, more saturated, and sharper. Conversely, as objects recede into the distance, they lose contrast, color intensity, and clarity. This is caused by the atmosphere acting as a natural filter. The more air there is between the photographer and the subject, the stronger this filtering effect becomes. This is how our eyes naturally see the world. On a raw digital sensor, however, distant objects often appear too dark and overly sharp, depending on how atmospheric haze interacts with the camera and which wavelengths of light pass through. To counteract this and add depth to my images, I use high contrast in the foreground and low contrast in the background.The composition should guide the viewer's eye from front to back toward a single point—creating a strong sense of perspective. Elements within the frame should ideally flow diagonally from the foreground to the background. The same rule applies to light. Diagonal lighting plays a massive role in creating visual depth. While these editing adjustments might seem subtle, they are exactly what transforms a flat photo into a high-quality, three-dimensional experience. When it comes to color theory, I love using complementary color pairs, such as orange and blue. During the edit, I always choose tones that feel organic to the actual scene. Sometimes a scene is naturally complex in its color palette; in those cases, I prefer to leave the original tones untouched. It all comes down to a fine-tuned intuition for color. Editing should never be a tool for chasing cheap attention at all costs. Subtlety and artistic restraint are key.
Editing a Final Landscape Photo
Here is my personal Photoshop workflow. It is always best to avoid techniques that degrade color, kill sharpness, or introduce noise.
a) I open the TIFF file in PS and start with a crop to clean up the composition and simplify the scene. Next, I clean up any unwanted artifacts—like dust spots in the clouds or distracting elements that mess with the image's balance, brightness, or subject matter. I usually stick to the clone stamp or patch tool.
b) I open the Camera Raw filter and use linear gradients to balance the sky and foreground. I gradually darken the transition from front to back while tweaking dehaze, texture, and clarity. I do this very subtly while checking the image at 100% zoom. If you push these sliders too far, you start destroying things at the pixel level (pixel peeping warning!). Finally, I do some global adjustments. I never use Auto mode; sure, it keeps the histogram safe, but it tends to crush the highlights by overdoing the exposure and highlights sliders. And never sharpen globally! Global sharpening just creates ugly white halos around your subjects.
c) I finish the rest of the edit in PS using classic adjustment layers and masks. For the background, I like to duplicate the layer, lift the exposure to the desired level, and apply a Gaussian Blur. Then I just brush the effect into the background through a mask. Standard procedure.
d) For the foreground details, I use the Dodge, Burn, and Sponge tools—for example, to make flowers pop. I also rely on the History Brush tool here to easily paint back the original layer if needed.
e) If the horizon is clean, I skip the HDR merge in Lightroom and manually blend the bracketed shots in PS as layers. I create a mask from the blue channel and brush it in. This works perfectly as long as there is no risk of ghosting.
Editing is truly the only stage where you can inject your own vision and artistry into the photo. That said, I am not one of those people who spend hours tweaking a single image. I live by the rule that the best photo is the one you don't have to edit at all...
PTgui Pro – The Ultimate Panorama Tool
Thanks to this software, you can stitch panoramas quickly and with pixel-perfect precision from a ton of source images. On top of that, it can natively handle bracketed series and spit out each exposure layer separately. Another great feature is using masks to paint in or clone out specific parts of the image. You can also fine-tune exposure differences by tweaking individual frame parameters, fix image geometry, and so on.
a) The foundation of a killer panoramic shot is preparing high-quality source frames with a 20% overlap, shot in rows. My personal workflow is to shoot the bottom row in steps from right to left, then level the tripod head with the horizon and shoot the middle row from left to right. Finally, I tilt the head up and track the top row from right to left again. I always add one extra frame at the edges of each row just to be safe. But watch out for one crucial thing: when you are shooting the top row with the sky, always keep a bit of the horizon at the bottom of the frame so PTgui has some control points to anchor and stitch the images together! A click-stop panoramic rotator determines the exact horizontal step. I really appreciate this when the light is changing fast and there’s no time to eyeball the overlap. Even with bracketing, the whole capture process takes about a minute. If the ambient light changes dramatically while shooting, you’ll have to fix the tone differences frame-by-frame in post, which is a major pain. That's why I always try to hit that sweet spot when the light is rock-steady.
b) Check the "Enable HDR mode" box. Along with the settings window, I always keep the Panorama Editor open. Why? Because there’s a progress wheel in the bottom left corner of that window that shows you if the software is cooking. It’s always best to just give it some time to do its magic.
c) Hit "Align Images" and the program will generate a preview of the stitched layers in the editor window. If the preview doesn't show up, I know I messed up big time somewhere. In the editor, I set the image geometry (90-degree rectilinear cubeface) and use the side sliders to adjust the field of view (FOV). In the right-hand menu, I enable Exposure Fusion and fine-tune the Brightness, Tone Mapping, and Highlight Reduction. Right here in the editor, you can immediately tell how well you leveled your tripod and set up the nodal point on your pano-head. If the image is tilted or off-center, your tripod and pano-head setup was sloppy!
d) In the editor, you can crop the image using the yellow guidelines on the edges. Left-clicking and dragging lets you move the image along its projection trajectory, while right-clicking rotates the image around its central axis. The tiny white triangle at the bottom toggles a grid that matches the image geometry.
e) On the right side of the editor, you’ll find the Blending menu, where you can set how seamless the seams between frames will be. I usually go with 1/2 precision and use the Multi-band Blender. The next step is rendering the actual panorama. I just click "Create Panorama" in the Project Assistant.
f) I save the final exposure layers as 16-bit TIFFs (no compression, no alpha channel), set my output path, and check "Blend planes" in LDR. You can also have the program output a pre-blended image directly.
g) The final file size of my panoramas is usually around 1.5 GB. I scale that down by dropping the resolution. I switch the selection from "Optimum size" to "Megapixels" and type in 150. This brings the file size safely under 1 GB. Working with files over 1 GB is a drag because the software has to crunch too much data, which bogs down your machine and slows everything to a crawl.
h) Now I hit "Create Panorama" and PTgui renders a stitched frame labeled as a panorama for each exposure layer. If I use a 5-shot bracket with 1 EV steps, it spits out 5 panoramic images with a 1 EV spread.
Like I said, PTgui has plenty of other tools under the hood. But for a solid foundation, what I’ve described here is all you need. Feed the software good source files, and it won't let you down. Trying to fix something like bad overlap after the fact is incredibly tedious and, above all, a massive time suck.
Final Thoughts
Sharing this basic landscape workflow is a personal milestone for me. It’s a privilege to pass down my notes to fellow photographers. This isn't the ultimate guide, and I’m not pushing it on anyone—it's just a snapshot of how this retired grandad works after 25 years in the game. Honestly, if you have a tip on how to streamline my process, hit me up in the e-mail! I was never a pro, just a dedicated enthusiast. Now that I’m retired, I finally have the time to slow down, scout locations, and just enjoy this beautiful stage of life through my viewfinder. To everyone who read this far: stay healthy. That’s priority number one. As long as I'm fit, I'll be out there capturing the world.
Happy shooting,
The Author & AI